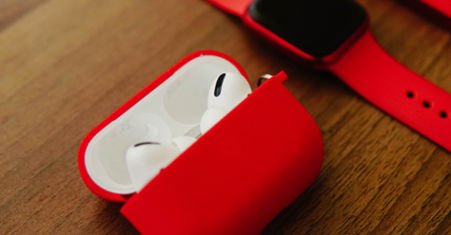
We can say that the noise cancelling feature is one of the important tools available in Airpods Pro. And because of its safe hearing feature, it is important to master the noise-cancelling feature on Airpods. The noise cancelling feature helps cut down the unnecessary distractions from the surrounding noises.
Suppose you are listening to your favorite music, podcast, or anything of interest while traveling or while walking through a busy street, the noise-canceling feature will cut off the surrounding noises and you will get an awesome personalized spatial audio experience with whatever voice you choose to listen to on your AirPods. The inbuilt microphones available in AirPods recognize the external sounds and cut them down with an active noise cancellation feature.
Before jumping into details of Mastering the Noise-Cancelling Feature on Your AirPods Pro, here is some good news for you. Apple is offering 6 months of applemusic free with your airpods. Isn’t it a good Airpods pro deals?
Understanding Noise-Cancelling Technology
We can understand Noise-Cancelling Technology by understanding how noise-canceling works and what are the benefits of using noise-canceling.
- How does noise-cancelling work?
We are not going to dig deeper into technology, but what I learned about What Is Noise-Cancelling On Airpods is that there is a destructive interface that is created by the microphones built into Pro and AirPods Pro Max. These microphones that feature Apple Airpods Pro understand external sounds or noises and create waves for active noise cancellation.
- Benefits of using noise-cancelling
Just imagine if you are a student living in a hostel for higher studies. You have exams over your head but your friends got a Birthday celebration. And you want to listen to the podcast on your important topic. Here your AirPods may save you with its noise cancelling feature.
Now imagine if you are a professional sitting in a restaurant dealing with a client on your phone. Then your AirPods may help you avoid the embarrassing situation by saying to your client “I beg your pardon” again and again.
Similarly, if you wish to get relaxed with your favorite music while on the go through a busy street or while traveling, your AirPods Pro will prove to be handy for enjoying your me time with your favorite music.
Now the question is- Is AirPods Pro worth buying?
In my opinion Yes because Airpods Pro are the upgraded version of its predecessors with noise cancellation feature and improved transparency mode, better battery life and versatile as per the need of user. If you want spatial audio experience then it may be good option for you.
Activating Noise-Cancelling on AirPods Pro: A Step-By-Step Guide
Here I will tell you modes to activate noise cancellation on your Airpods Pro. It will involve two steps as below-
- Step 1: Accessing the Control Center
- Step 2: Enabling noise-cancelling feature
For that first of all you will have to pair your iPhone with the Airpods. Let’s see how to do that-
How to Pair iPhone with Apple’s AirPods Pro 2nd generation-
- First of all, go to Settings on your iPhone.
- Click on Bluetooth and turn it on.
- Open your Airpods’ case. As you will open it, you will see Airpods’ animation on your iPhone screen. Tap on the Connect option. This way your AirPods will be connected to your iPhone.
After pairing the AirPods, we will follow the following steps to activate the noise-cancellation feature-
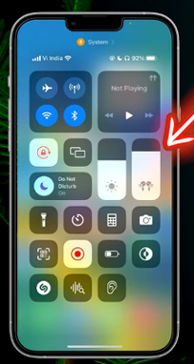
- Step 1: Accessing the Control Center
The first and easiest way to activate noise cancellation is by using a control center on your iOS devices. To activate Noise-Cancelling on your iPhone, first of all, wear the AirPods in your ears. Now open the control center on your iPhone as shown in the images below-

- Step 2: Enabling noise-cancelling feature
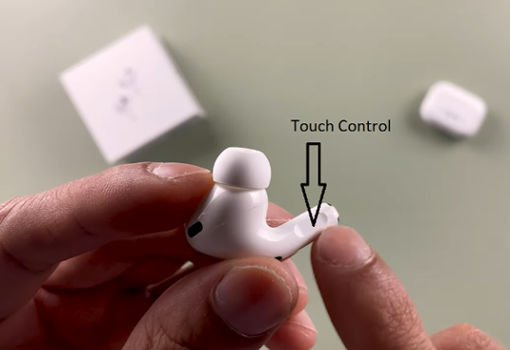
To enable the noise canceling feature, press the Touch control on your AirPods as shown in the image above. It will help to switch between Noise Cancelling mode and Transparency mode.
When you press long on touch control on your AirPods, you will see it will automatically switch on Noise Cancellation. If you press the touch control again, it will switch to transparency mode.
Here you will have to remember that if you remove one AirPod from your ear and try to switch on Noise-cancelling, it will not be done. For the Noise-Cancelling feature to activate you will have to wear both Airpods. With one Airpod it will automatically go to Transparency mode, and if you will press the touch control again wearing the single Airpods, it will get switched off.
How To Connect Airpods Pro to Mac
To connect AirPods Pro to Mac, simply follow the following steps-
Steps to Connect Airpods Pro to Mac
- Click on the Apple logo on your Mac PC and select the System Preferences option.
- Under the System Preferences menu click on Bluetooth and select Turn on Bluetooth.
- Now open your Airpods’ case. At the back of the case, a round paring button is given. Press and hold this pairing button.
- When you press and hold the pairing button, you will find your Airpods Pro case will start blinking with a white light in front of the case.
- On your Mac, in the device list, you will find your Airpods’ name. Click on the Connect option. and click on Enable.
How To Turn Noise Cancellation On Or Off for Airpods Pro On Mac Or MacOS-
So far we have learned how to pair Airpods Pro to Mac. Now we look at how to turn on or off Airpods Pro on Mac–
- Follow the Steps given to Connect Airpods Pro to Mac and pair the Airpods Pro to your Mac device.
- After pairing Airpods Pro to Mac, click on the Apple logo on your Mac device and Select System Preferences.
- After selecting System Preferences on your Mac, click on Sounds and check the box at the bottom showing “Show Volume in Menu Bar.”
- When you check the box showing “show volume in menu bar”, you will find the volume icon on your top right bar.
- Click on the volume icon from the top right bar on your Mac book and select your connected Airpods’ name from the drop-down menu.
- When you select your AirPods from the drop-down menu, you will get the Noise Cancellation option in a separate connecting window. Click on Noise Cancellation to activate Noise Cancellation on your Mac device.
- You can also switch to transparency mode given just below the noise cancellation option.
- To turn off noise cancellation on Mac, simply click on the sound logo on the top bar, click on your Airpods’ name, and click on noise cancellation (which was turned on by you). It will turn off noise cancellation on your MacOS device.
Adjusting Noise-Cancelling Levels
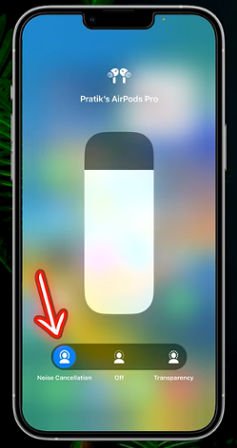
You will find three options and two noise-cancelling modes in your AirPods Pro. These three options include noise cancellation mode, transparency mode, and off.
- Noise-cancellation Mode-
The Noise-cancellation mode cancels the active surrounding noise so that you can be more focused on whatever you are listening to. The active noise cancellation feature is useful while reading, attending a conference call, meeting, etc.
- Transparency Mode-
This mode does not cancel out all surrounding noises but reduces them to a certain level. The transparency mode may be beneficial when you want to listen to something but also want some surrounding noises to pay attention to. For example, if you are listening to music at home but also want to pay attention to the doorbell for your pizza delivery.
The third option is “Off” to switch off your AirPods.
- How to switch between Transparency mode and Noise-Cancelling mode
When you long-press the touch control on your AirPods, Noise-Cancelling mode gets active while wearing both the AirPods. If you press the touch control again, it will switch to Transparency mode. And if you press the touch control again, it will switch off the Airpods.
If you remove one of your AirPods while the Noise-cancellation feature is on, it will automatically switch to Transparency mode. It means the Noise-cancelling feature will work only when you wear both AirPods.
You can also switch between Transparency mode and Noise-Cancelling mode from the control center as we have already discussed above in this article.
To switch between Transparency mode and Noise-Cancelling mode, make sure your iPhone or Mac is connected to your AirPods.
Conclusion
I hope you find this article helpful to have a better understanding of Airpods Pro, how they work, how to connect the AirPods to different Apple devices like iPhone and Mac, what are different noise-canceling modes, and how to master the noise canceling feature switching between different modes.
Frequently Asked Questions
Are AirPods 3 or Pro better?
Though the Pro model has all the features that an Airpods 3 carry, they are better in terms of cusioned buds, noise cancellation and transparency modes with only drawback that Airpos 3 have better battery life.
Can iPhone 15 charge AirPods?
Yes iPhone 15 can charge AirPods with the help of USB C charger.
What is the latest version of AirPods Pro?
The latest version of Airpods Pro is Airpods Pro 2 which was recently launched in September 2023 by Apple. They have USB C charger replacing the old lightening chargers.
You May Also Like:
Samsung Galaxy Z Fold 5 review: Know Combined Views From Experts